Friday, January 3, 2014

The Fuzzy Pickles Post

I have no idea why it's called that. Well, it's an Earthbound reference.

Greetings, and most importantly, Happy New Year! I'm posting because I just hit a pretty special milestone on the Earthbound(EB)Winters project. Which is, having all of the "natural" elements completed. All of the things found in nature, nothing man made. This also excludes effects, such as smoke, rain, etc. Of course nothing is truly finished until it's in the can and ready to go, as always. Incidentally, I glanced at the last post I made and realized it's been since October, and I literally had NO texturing on this bad boy. So seeing the progress on it makes me happy. I'm proud that I was able to get so much done considering the holidays just happened, especially with me being home in Wooster for a week, not working on anything. Being lazy. Which is what we all need sometimes, right? Hell, NetherRealm gave us TWO WEEKS off. TWO. Which seems like overkill to me, but hey. Most normal, well adjusted people would think "Oh goody! I can you know, NOT work for awhile. Sit on my ass and watch tv or something." Or whatever it is that they do. I have no idea. Me? I use the opportunity to work some more. In all fairness though, about half of the time it doesn't seem like work. That's a luxury I'm afforded with my profession. Anyway, on to the stuff.
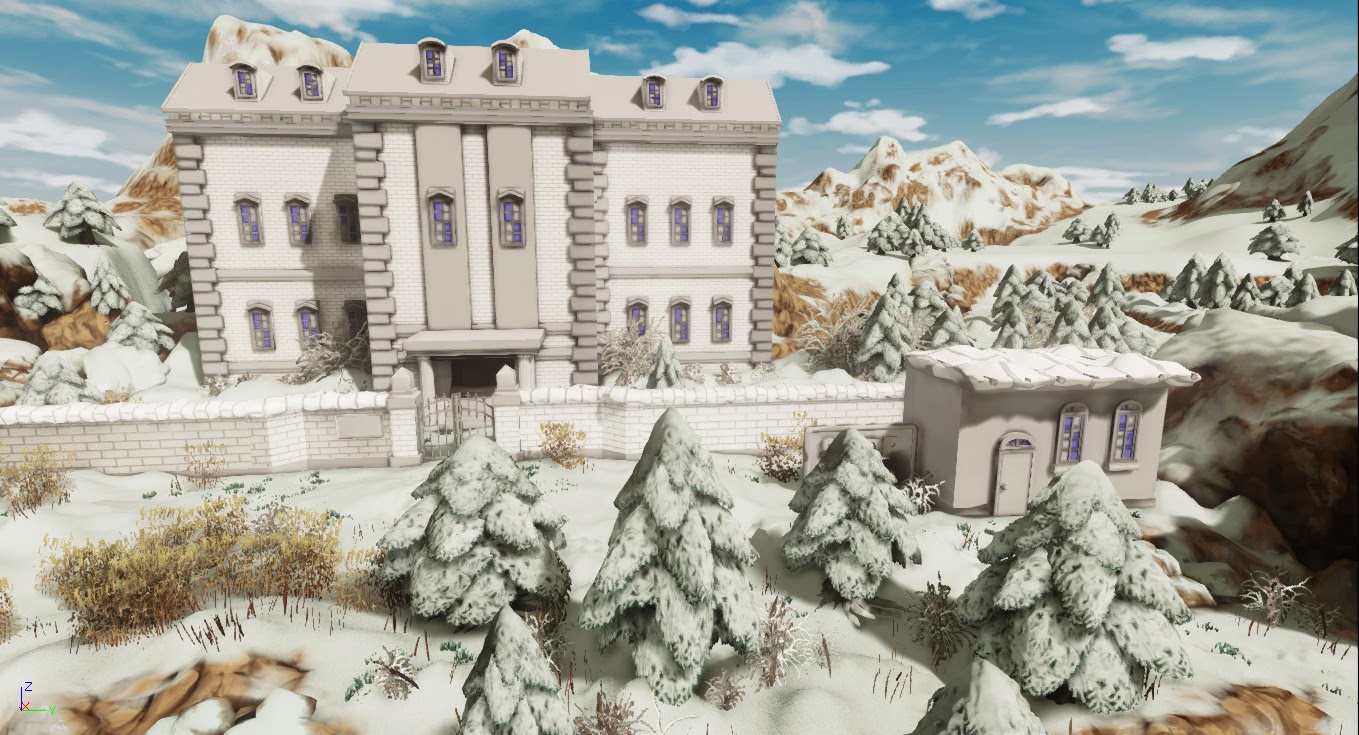

First thing is, trees. The trees were quite a bit of work. I ended up not putting as much time into the actual trunk as I thought I would. With the way the shadows fall off of the leaves, you just don't see it well enough. All the detail is ZBrushed in, which I wouldn't even begin to know how to get otherwise. The style I chose is pretty unique, so even if I resorted to using CGTextures on this project, it wouldn't look right. The big struggle was mainly in making sure that the leaves (or fronds, or whatever you would call them) look believable, but don't have too much high frequency detail. I also found that having too many holes where the pine needles show through gave it too much of a uniform spotted feel. So I steered away from that and added more general piled snow.    


The amount of snow itself was something I came more and more to grips with as I went along. At first, I wanted some large patches of grass to show through, giving the environment sort of a "It just snowed a bunch, but now it's thawing out a bit" feel. But even with a UDK terrain that has such high tessellation like mine, painting the grass in still didn't give me enough resolution to look good. So I stuck with just having some blades sticking out here and there. It's actually more true to the original EB art, and I don't think it would be possible to get the terrain to a higher resolution if I tried (and get it to actually run in real-time). Plus, it would negate a month's worth of work. All in all, I'm happy with the overall look.  


It was a pretty big challenge to get enough bushes, trees, tall grass, etc. to make it look believable. In the original sprites, there's not much to be had. That doesn't translate well to 3D, so I took more creative liberty with that than probably anything else. I started with the tall grass, bushes, and small grass blades. Once I had those, it seemed like something was missing. So I added in a "trail" of footsteps mimicking the player's path. It's the sort of detail that only EB fans could appreciate, I'm sure. ;) Finally, it started to seem weird to me that the only kinds of trees in the level were pines. Which is accurate to EB, but again, didn't look good in my case. And so I duplicated and scaled up some of the bushes, which surprisingly made really nice looking trees. It's great when you can get such mileage out of your assets. I was debating making full 3D trees, but the polygon hit I would take from it would be too great in order to get something decent looking. And it's pretty hard to tell except at a very close distance that they're just intersecting geometry cards anyway.  


The water wasn't too hard. I used the same setup I had in the desert project I did awhile back, and tweaked it. I changed the image used for the reflection to match this project's skydome, and manipulated the size and speed of the waves. The only real challenge was making it look good where the water meets the shoreline. I adjusted the depth biased alpha node to make it so the water fades out near it, and you start to see the details beneath.


Lighting was a B-I-T-C-H. Well, at least for the foliage. I messed with a lot of lightmass values, and tweaked the intensity of the light. Which doesn't sound like much to a non-lighting artist, but one could tell you that it's a long, drawn out process. Sometimes you have to do a full lighting bake after messing with just one setting, and there are literally hundreds of them. And when your baking time takes at least twenty minutes, it adds up. If I were still using my old machine, it would take at least forty five to an hour. So then, with the foliage. I. Hate. Lighting. Foliage. In UDK. Really, it's the worst. I kept getting that problem when some of your geo planes look dark and some light. I messed with tons of settings, journeyed through message boards, banging my head against my desk only to find that my problem was really simple and completely unnecessary. I had to make my plants NOT be two-sided materials. Yup. The main thing you have to do to make vegetation look good in games. I had to settle for making more geo planes facing in all directions to still maintain that full, lush feel. It increased my poly count quite a bit, but I had to do it to make it look good. Also, I'm not crazy with the shadows they cast. They aren't how real plants shadows look, as real ones are more defined, and not so blurry. This is due to having such a huge terrain, and upping the shadow map resolution for it would crash my lighting builds. So I'm stuck with having it the way it is or having no shadows at all, which looks even weirder. Lastly, I've decided to do a nighttime lighting pass as well. It's fairly easy to set up daytime exterior lighting, and I have always done it that way. So having to add in additional lights to make the scene have visual interest at night would be a good exercise. Not to mention that in EB, you start out at night and see the environment change to day. Another potential cool reference.          


The skydome was pretty straightforward to make. I have one 1024x2048 texture. In the RGB channels lies the background with the main blue hues, and smaller, more subtle clouds. In the alpha of that texture are more pronounced cumulus clouds that sit on top of the background. Then I plug it all into a shader that pans both the background and clouds at different speeds. It's a simple, but spiffy effect. And oh yeah, the sky is completely hand-painted just as everything else is. I'm really proud of that fact, knowing how much I've improved with my painting skills over the past year. That's the one moment in this post I'm taking to gloat. :P


And by far the most time-consuming of all things, the terrain. I did more iterations on this than anything else. The mountains started out looking too flat, so I added in those rock meshes that I originally thought didn't fit. Turns out that when scaled up a bit, and with different texture scaling, they added an extra umph to the cliffs that I needed. The piled up snow effect got some more tweaking as well. I was able to get more detail out of the piled snow by using the height map of the rocks instead of the vertices to determine how it piles on. For the smaller "mini" cliffs in the walk-able area, I had to take a different approach. No matter how much I messed with the settings, I couldn't get the amount of snow to allow for just a little bit of exposed rock at the bottom, due to the scale compared to the cliffs. The rocks would always look completely snow covered. So the solution was to instead paint on the snow manually with vertex colors. Using the height map once again for the mask allowed for enough control to get what I needed. Making the caves look right was also tricky. They're unique meshes on their own and required that I do a lot of trickery with hiding parts of the terrain and adding in some meshes to cover it up.


So yay! That's what I got. Still a pretty decent amount of stuff to do left. I'm gonna try to make as much use of my last 3 days off as I can to chip away at some of it. I just bought a crap ton of games during the Steam Holiday Sale, which attempts to distract me, but I think I'll hold out just fine. As it stands, this is what I got:

1) Texturing man-made assets
2) Effects (Rain, steam, leaves, flames)
3) Nighttime lighting pass
4) Animation
5) Camera setup and recording
6) Taking screenshots
7) Post production (making final images, fly-through movie)

As always, stay classy!

Thursday, October 24, 2013

SMAAAAAAAAAAAAAAAAAAAAAAASH!!!!!!

Heya folks! How's everyone doing? Good? That's good. I've been working real hard as of late, making some pretty art. The Earthbound Winters level is all laid out, and I just got done Zbrushing all the assets that needed it. Unfortunately, I'll have less time to spend on this thing for awhile. However, the reason for this is awesome. Two weeks ago, I started up again at NetherRealm. It'll be another 9 month stint like last time, which means it'll last me until July-ish. Employment is gooooooooood. Anyway, on to the art stuff:


Drug Store Tiling Brick- A fairly simple tiling texture. I wanted it to have that almost globby painted over feel to it, with a bit of wear and tear. I exaggerated a lot of the details as I usually do. Baking a high-poly mesh down to a normal map sometimes washes out the details you need, so it's best to dial them up a bit to compensate. There's also a more plain, undamaged brick texture I'm using as well. It's not as interesting to look at on its own, so no need to show it just yet....
 

Brick Road Wood Planks- There are seven pieces in total that make up the entrance to the dungeon created by "Brick Road", a man who well, makes dungeons for a living. These are just a sampling of them. It's a makeshift entrance made up of these things, all hastily boarded together with nails and painted on. The overall final result isn't ready for show yet, but I'm confident it'll look just as quirky as the sprite from the original Earthbound version. It's a pretty good exercise to look at real life references and make stylized versions. Essentially, that's what I'm doing with all of these sculpts. I think a lot of the struggle comes from getting rid of / preventing high frequency detail from getting into your models. This is especially tricky when you use alphas, as they cause a lot tiny bumps to show up, which can be a huge pain to smooth out all around the entire model. It's worth it in the end though, when you achieve something that looks believable yet interesting and not just another photo realistic prop.


Cliff Face Detail Setup- I was banging my head for awhile on this one. I went through 3 revisions of the cliff face design and finally decided on this one. It's actually pretty simple and is used quite a bit in landscapes. You make a piece that has its own unique UV's, and then you make a tiling detail map that overlays on top of it. That way, you get nice close up detail while also getting the larger details that look good from a distance. It was tricky to get this mesh to fit into the existing terrain. I had to make a variant that bends around corners, two that are essentially the mesh cut in half, and one that houses a cave opening.


Shore Boulder- This is actually the second revision of the cliff face above. It turned out that I could use it after all on the shoreline. They made a great fit for this, and the fact that it's designed to be rotated all around gives me a lot of bang for my buck. Amazing how much mileage you can get from one prop when clever scaling and rotation is applied. :)


Stonehenge Pillars- These guys took awhile, but it was worth it. 6 pieces total. I tried to make each side look completely different so that the overall composition of stones has enough variation of shapes and detail. It's really interesting to see how different rocks look when they've been around for ages. It gives them a completely different texture then you're used to. I'm debating whether or not the moss will stay. It doesn't make sense to stay on in the middle of Winter, but maybe it'll still look good. Who knows.


Tree Trunk- This was my warm up model. It had been awhile since I last picked up Zbrush, but I was surprised with how much I knowledge I retained. It turned out really well though, and literally took forever to detail. No alpha maps here. Just good ol' fashioned sculpting. It was tricky nailing down which type of pine bark I wanted, and I must say that getting good quality reference for it off of Google is much harder than you'd expect.


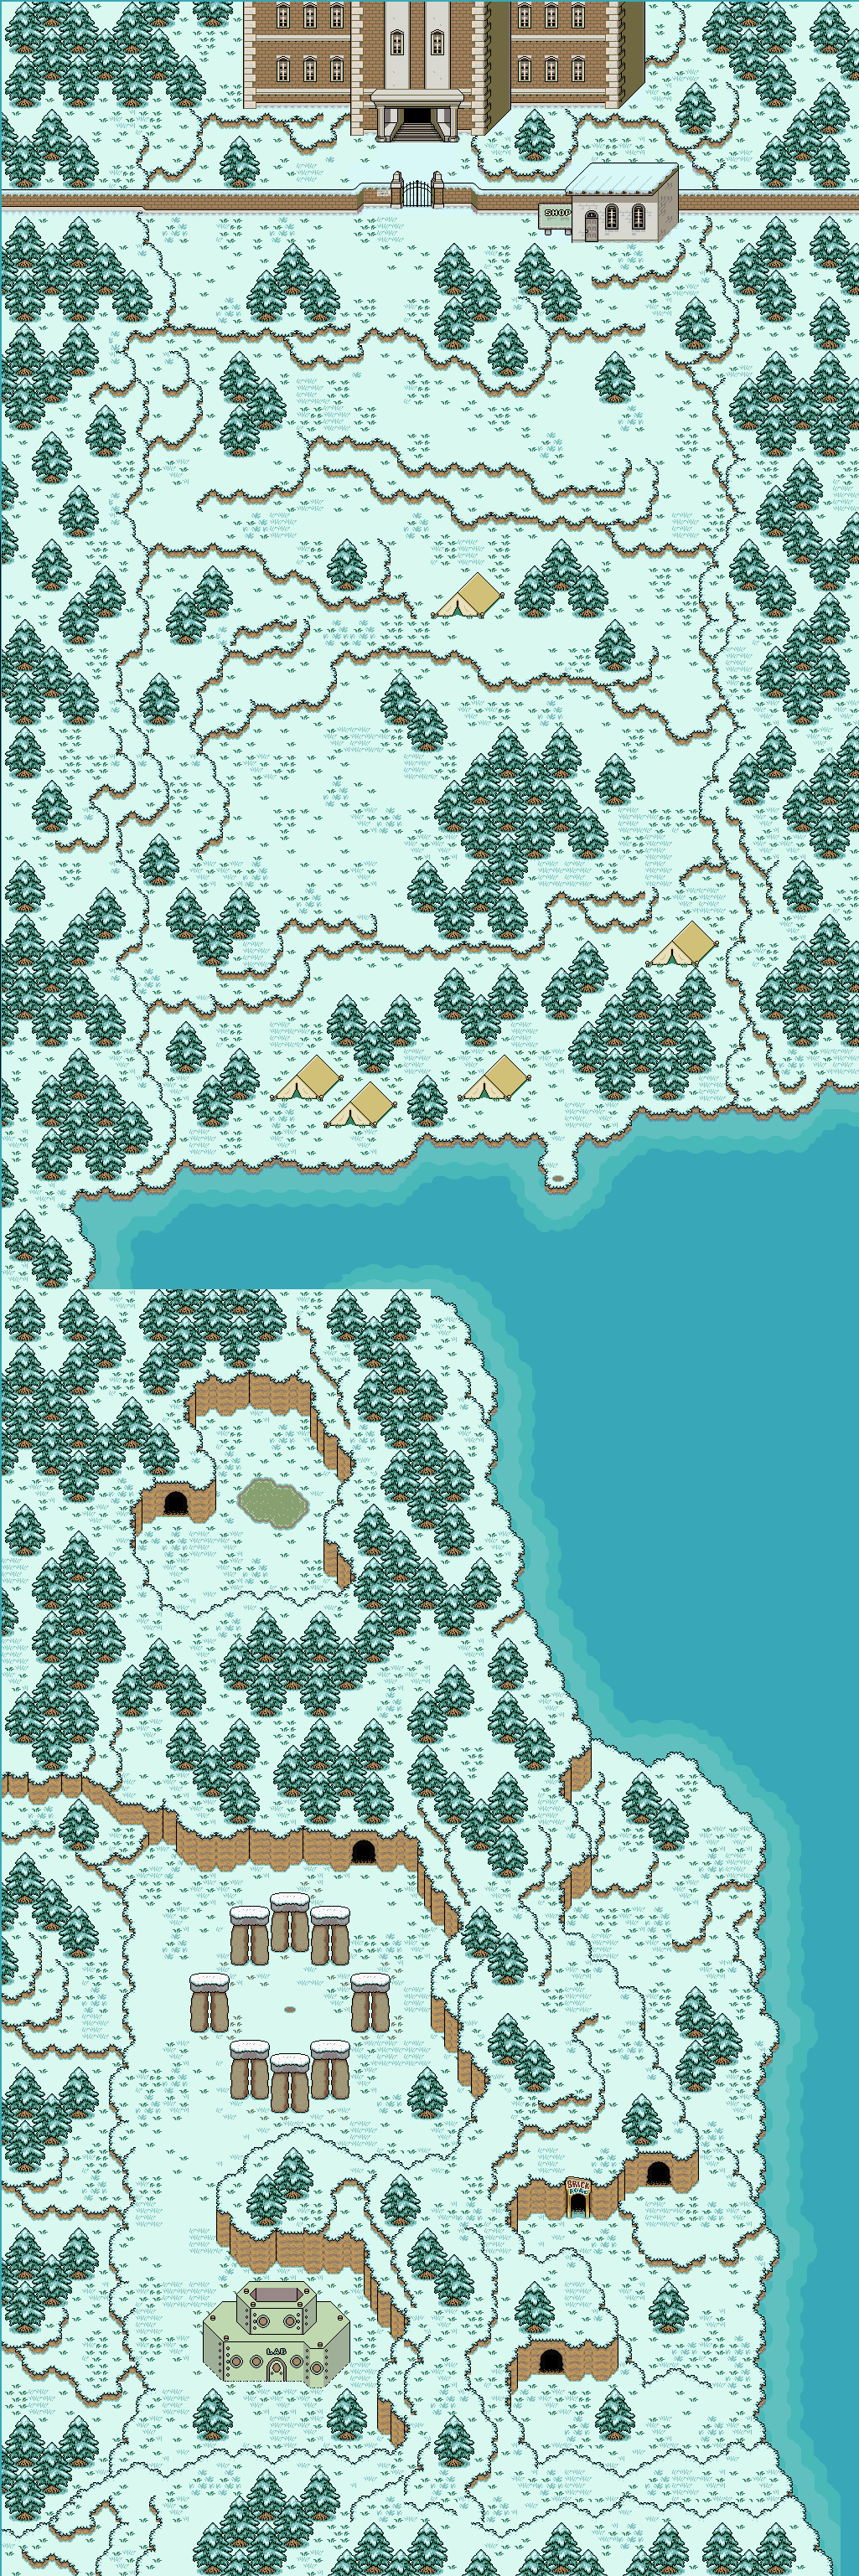
And finally, some screens of the final layout. Seeing it all come together like this is what usually gives me that final push to finish a project. That feeling of "Oh my god, I might ACTUALLY get this done!". Wonderful feeling indeed. Not much to say really, it matches the layout of the original. I haven't made such a huge sprawling exterior since the Desert Straggler environment, and I'm happy to say that this dwarfs that in both quality and scale. So from here on, it's texturing (the big one, obviously), lighting tweaks, effects (new territory for me), and overall polish. You know, no big deal.

Friday, August 2, 2013

Many Happenings

Hello there, my peoples. Lots of new stuff going down this update. I'll begin.

1) The new website is up! As always, it's at www.ryansanderson.com. Once again, my excellent web designer girlfriend Jennifer A. Vacanti did all the web work. She's awesome. :) It's got new work and an updated resume. Speaking of that new work:

2) The stuff I did on the Man of Steel IOS app is up there in a brand spanking new gallery. I used Marmoset to pretty everything up. It's an excellent program used to present portfolio  pieces. MUCH more flexible than my previous method, which is the static mesh viewer in Unreal. The website is here if any of you are interested: http://www.marmoset.co/

3) The splash page is now my Injustice demo reel. Got it uploaded to youtube with surprising quality. MUCH better than my attempts with past projects. And there are new images in the stills gallery as well. I must say, I'm feeling pretty good about all the work I compiled from good ol' NetherRealm. It was a big jump in quality from my previous work. I suppose actual industry experience will do that.

4) Yes, I'm still working on the Earthbound Winters level. I'm currently sculpting the terrain for it. There will be an update once it's in place. The project got pushed to the back burner when I realized I needed to get my Man of Steel stuff together. But now, along with other things, it's on the forefront of things for me to do. Those other things:

5) The last bit of news is sad. My time at Phosphor is done. The contract is over now, so I'm looking for work. I'll miss working with all my good pals there. 'Twas an excellent experience for me. But at the same time, I'm excited.

 Excited for things. FUTURE things.

Wednesday, April 24, 2013

Models, For the Kids.

Yes, that's right. Models for all the boys and girls. But mostly the boys. And the girls.

So now I'm done with phase one, which is modeling all of the man-made props. The main thing I was keeping in the back of my head the whole time was to try to stay true to the original setting, while also adding in some shiny new design aspects to make them pop more in 3D. Plus, it's nice to add that personal touch. You know, sort of make it my own. You look:


1) Dr. Andonuts' lab was pretty straight forward. I changed how the lights looked, added a back garage area, and also put in an opening hangar in the top. More on that later. 2) Stonehenge was also pretty straight forward. Making it look exactly like the sprites would be extremely boring, so I'm making the arrangement of stones a bit more like its real world counterpart. There are 6 pieces in all, made to look realistic at first. But then I went in and exaggerated the shapes to give them that cartoony look. 3) The same goes with the entrance to Brick Road's dungeon (the entrance with a bunch of wooden boards nailed together). I chose to give it that messy makeshift look, because the character Brick Road is a bit disheveled himself.


 In the sprite it's a lot cleaner looking, due to graphical limitations I'm sure. 4) The pencil statue is of course a hallmark for the game, couldn't leave that one out. It's a pretty simple prop to model, though I added some detail where I could. 5) The tents are fun and they look a lot like the sprites. I still need to make two variations: one with its flap open, and the other with it closed.6) The gate is another example of a simple prop that I added some detail into for visual interest. I'll have some alpha planes in it to add some fancy detail elements as well. 7) The walls surrounding it have snow piled on top, yet another opportunity for exaggeration by modeling in big lumps of snow for personality' sake. 8) Last but not least is the drugstore that sits outside of the dormitory. It also has that signature snow, and is pretty simplistic. The size of the windows are multiplied for exaggeration (Word of the day) like yes you guessed it, in the 2D sprite.

So now I'll start digging into making the organic props. Trees, grass, caves, and the terrain itself. Speaking of which, I've done some research and decided that the best route to take is to do the flat areas using UDK'S terrain, and then add in custom static meshes for the cliffs. This is mainly due to the fact that making holes in UDK's terrain is next to impossible, and custom, zbrushed meshes will look nicer anyway. The snow and grass areas will be nicely blended, with custom materials and grass meshes. I'll make 2 or 3 variations on the trees which coupled with rotation and scaling, should do the job in selling variety. I reckon that the next update will be after all of the above are completed. It's kind of weird because there are actually people that are genuinely excited about this project, so I feel a little extra pressure to get things just right. Can't go ruining the Mother name now, can I?  :)

I'm also (possibly) finishing up on my contract at Phosphor in a week, so I'm sure part of my time will also go into polishing up some of the work I did there, and throwing it into the portfolio site.

Also, it looks like someone has (sort of) already done a 3D take on Winters. Though it's not true 3D, it's still pretty neato: http://www.youtube.com/watch?v=q99Z9pp1ASQ      

Wednesday, March 13, 2013

PSI Rockin'

Man it's been a loooooooooong time! Even more so than usual. Much ground to cover.

First off, my contract with NetherRealm ended in late February. I was just a week short of hitting my maximum nine months, so that was pretty fortunate considering that there are many that don't even make it halfway. I enjoyed my time there a lot, and I hope to make it back at some time in the future. Injustice: Gods Among Us is looking like it's gonna be insanely good. I'm pretty stoked for it to come out.

Fortunately though, I just signed a contract with the fine folks at Phosphor Games! I'll be on until the end of April, working on an unannounced title. I start Friday. Their site: www.phosphorgames.com

And oh yeah, the new website is up! You'll see some of the fun stuff I made for Injustice in there, thanks to my awesome web designer girlfriend, Jen Vacanti. By far the best stuff I've done. Her site is: www.jennifervacanti.com.

So as for my personal work,  I've literally had no time at all for anything except for the NR contract. Lots of long hours worked, to get Injustice out the door. But now, I finally have time to get back into that arena. And so, my next project:


I'm doing a re-imagination of the Winters area from Earthbound, a.k.a. Mother 2. I played through it for the 4th or 5th time recently. It's definitely one of my top 5 favorite games of all time. If you haven't played it, grab an emulator and dig in. It's one of, if not the best SNES titles out there. I'm also playing through Mothers 1 and 3 right now. 1 definitely has not aged well, but 3 has been excellent so far. As you can tell, big fan of the series. Anyway, this is the original map of Winters:


EDIT: Here's a link to a version of the image that will let you get zoomed in nice and good. images2.wikia.nocookie.net/__cb20080803013402/earthbound/images/0/04/Winters.png

I chose it because it's not ridiculously involved with the amount of stuff it has, but I'm confident that if I give it enough love, it'll look great. I've already modeled about 1/8 of it, so there's quite a bit left.

As always, I'm going to try to dabble with some new features that UDK has picked up since I left it last.

1)Advanced Environment Color- Basically, it's a way for UDK to not only give only one env. color that mimics the sky, but it also allows another color to influence the ambient lighting given to the environment. Specifically, the color of the sun.

2)Unreal Landscape- This is the big one. If any of you remember the Desert Straggler project, it used the old terrain system. Which was garbage. It looked nice, but I couldn't get a decent framerate out of it. It was SO bad in fact, that Epic scrapped it and remade it into this current version. I still don't know how it exactly works, which it will affect how I go about making the terrain.

3)Simplygon- A new tool that allows you to combine static meshes and automatically create LOD models for better optimization, right inside the engine. Should be handy.

4)There's a new suggested modeling workflow that should make mesh normals look better when they're rendered. I'm curious to see how much of an improvement it is.

5)Effects- Another big one. I'll need to learn how to dabble in effects work to get give certain elements that "WOW!" factor. I'll need steam coming from the lake, rain drops above Rainy Circle (lonely-looking puddle north of Stonehenge), and perhaps some snow and floating leaves added in. The trees might move slightly, but that's more of a material editor sort of thing.

I will also be trying out NDO, a spiffy new program made by the folks at Quixel. It makes normal map creation a lot faster, with more control. They also have a new one called DDO, which handles faster texture map creation. Still don't know how I feel about it. Almost makes texture creation seem redundant. At any rate, I don't think it fits this project anyway.

It's all going to be done in a more cartoon-y style rather than realism. I want to treat it like it's how Nintendo might do it, if there was a remake. Good points of reference would be Team Fortress 2 and Pixar films.

As always, expect to see progress posts. I won't be hitting any crunch for awhile it seems, so progress on this should be fairly smooth. On top of this though is a project I'm working on with my Concept Artist friend, Max Hudetz. He's doing a tasty fantasy themed concept painting, which is coming along nicely. You can see it on his blog:  maxhudetz.blogspot.com

Laters!

Wednesday, July 25, 2012

Props that are urban, as well as other things I've been sitting on.

Well hello there. This is the part where I say that I've been neglecting making posts here, new things that have happened in my life, yadda yadda.


 Urban props project is done! YOU LOOK!


 Of course, they're all up on my website as per usual: www.ryansanderson.com

These are all hand-painted. That's the main takeaway. I wanted an exercise that would help sharpen up my texturing skills. So I forced myself to not use any photo sources for the diffuse map. It succeeded, I think. Some textures were alot more involved than others in their creation and needed more wear and tear. Didn't want to go absolutely crazy with it, though.


The big thing I've learned since Miami Deco was the awesome holy power of specular gloss maps. They basically help make multiple surfaces have different sized specular highlights (EX: A plastic surface having a smaller highlight on it than say, metal or concrete). This has helped TREMENDOUSLY in making things look more realistic. You can really see it showing in the traffic cone and trash can pics especially.


This project was conceived for two reasons: 1) To make something that would have a quicker turnaround, and 2) to show something that's not a full-on environment. I've been told I needed some individual props. Reason #1 didn't really go as planned as you can see. But there's a good reason for that. A VERY good reason for that, which is.....


I GOT MY FIRST INDUSTRY JOB! WOOOOOOOOOOOOOOOOOOOOOOO!!!!!!!!!


I've been hired on as a temporary associate artist at Netherrealm Studios. It's actually been about two months since, but I've been way too busy as of late to mention it. They're having me model and texture props and environments for their upcoming game, Injustice: Gods Among Us. It's gonna be super sweet. :)

I can't even begin to describe how weird/amazing it is to be getting paid to do what I actually enjoy. It's completely badass. I'll be posting screenshots/videos as they get released. To keep with the tradition of this blog however, I'll keep it limited to stuff I've actually worked on.

What's the plan now? Eat ice cream and figure out what my next project will be. More on that soon....


Sunday, May 6, 2012

Ding! Bakes Are Done

As promised, here are those normal maps for the urban props. Each image contains two views of each object, as well as the actual normal map image.


The actual maps are still a bit rough right now, but I want to get going with the diffuse maps first before I get too deep into fixing them. So yeah, everything's set up in the engine. Lighting will change based on the diffuse mapping, and the actual surroundings in which i present the props will change to something a lot more awesome. That's gonna a bit of a surprise. ;)

Stay tuned for base color pics soon.