Wednesday, July 25, 2012

Props that are urban, as well as other things I've been sitting on.

Well hello there. This is the part where I say that I've been neglecting making posts here, new things that have happened in my life, yadda yadda.


 Urban props project is done! YOU LOOK!


 Of course, they're all up on my website as per usual: www.ryansanderson.com

These are all hand-painted. That's the main takeaway. I wanted an exercise that would help sharpen up my texturing skills. So I forced myself to not use any photo sources for the diffuse map. It succeeded, I think. Some textures were alot more involved than others in their creation and needed more wear and tear. Didn't want to go absolutely crazy with it, though.


The big thing I've learned since Miami Deco was the awesome holy power of specular gloss maps. They basically help make multiple surfaces have different sized specular highlights (EX: A plastic surface having a smaller highlight on it than say, metal or concrete). This has helped TREMENDOUSLY in making things look more realistic. You can really see it showing in the traffic cone and trash can pics especially.


This project was conceived for two reasons: 1) To make something that would have a quicker turnaround, and 2) to show something that's not a full-on environment. I've been told I needed some individual props. Reason #1 didn't really go as planned as you can see. But there's a good reason for that. A VERY good reason for that, which is.....


I GOT MY FIRST INDUSTRY JOB! WOOOOOOOOOOOOOOOOOOOOOOO!!!!!!!!!


I've been hired on as a temporary associate artist at Netherrealm Studios. It's actually been about two months since, but I've been way too busy as of late to mention it. They're having me model and texture props and environments for their upcoming game, Injustice: Gods Among Us. It's gonna be super sweet. :)

I can't even begin to describe how weird/amazing it is to be getting paid to do what I actually enjoy. It's completely badass. I'll be posting screenshots/videos as they get released. To keep with the tradition of this blog however, I'll keep it limited to stuff I've actually worked on.

What's the plan now? Eat ice cream and figure out what my next project will be. More on that soon....


Sunday, May 6, 2012

Ding! Bakes Are Done

As promised, here are those normal maps for the urban props. Each image contains two views of each object, as well as the actual normal map image.


The actual maps are still a bit rough right now, but I want to get going with the diffuse maps first before I get too deep into fixing them. So yeah, everything's set up in the engine. Lighting will change based on the diffuse mapping, and the actual surroundings in which i present the props will change to something a lot more awesome. That's gonna a bit of a surprise. ;)

Stay tuned for base color pics soon.

Sunday, April 22, 2012

High Poly Sculpting Happiness For You

Don't worry. I'm not dead. Yet.

 Instead of death, I present to you some delicious-looking high poly models! :D


I've been working on some other stuff as of late, so this project kind of got put on the backburner. This time around, I'm trying to limit the amount of wear and tear I add to these guys. It gets really easy to get carried away and find that all of a sudden, there's way too much damage done to the model. The trash can and mail box are the most beat up looking, but still look like they're in working condition. This project is admittedly not focused completely on showing off my zbrush skills. It's more of a painting test for myself. I'm going to attempt to make all of the diffuse maps without using any photos. Straight hand painting. Which will probably take awhile considering. It feels like I rely on photo manipulation too much, so this will do me some good.

 Also, now that I have a better computer with more RAM on it, I can get higher poly sculpts.Which of course will help with the quality of my normal bakes, the next step in this process. It's a pretty tedious procedure at times, but pays off in the end. I think my next personal project will be an actual full environment as opposed to just a few props. I'll feel less obligated to zbrush everything since there's so much ground to cover, and making normal maps in photoshop will seem more acceptable for the sake of time.

As for other things in the mix:

The "other" project that I have apparently failed to mention before is the beginnings of an indie project. I don't want to get to deep into details yet, but we're in the pre-production phase. I've been gathering reference, finding possible music influences, watching movies/playing games for inspiration......all of that good stuff. On top of that, there's the usual watching of tutorials which never ends. Combine all of that with long hours at work, and.....well, you know.

In the next post, I'll have the normal maps up. Yeeeeesssssss......

Thursday, January 26, 2012

Low Poly Modeling Shenanigans

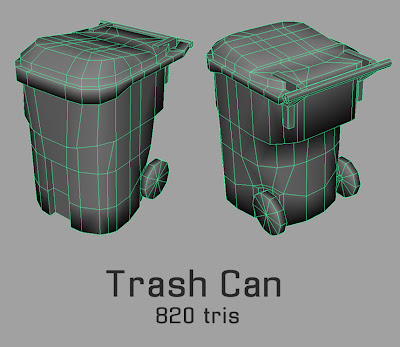
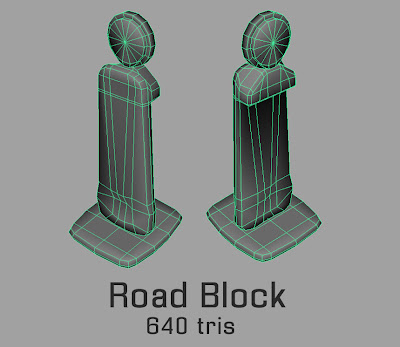
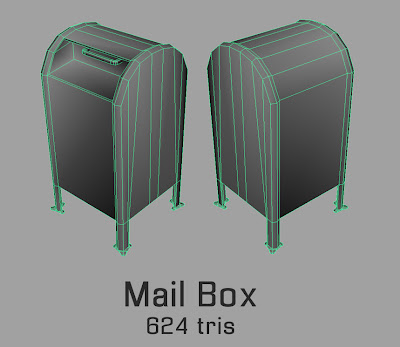
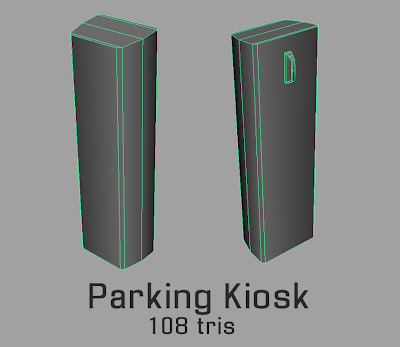
Hey kids, remember those individual urban props I mentioned that I would be doing for my next project? It's happenin'. Some screenies:


There's no big underlying theme or meaning behind this project. The main focus is to take something found in the real world and make it look as good in a game engine as you possibly can. I'm going to really be focusing on texturing for this project more than anything. I feel as though it's my biggest weakness as an artist right now. So I'm giving myself the challenge of making all four objects be entirely hand-painted in Photoshop. I don't care too much about how long it will take either, it's going to be a learning experience more than anything. I took alot of good pictures of these guys from a bunch of different angles, so that'll make for a more accurate reading of scale, texture, color, etc. As always, I'm not trying to really skimp on the polys as if it's for a mobile game. It's more to be used in an engine like Unity or Unreal.

Speaking of Unity, I've been really reading up on it as of late. This project will be the first thing that I've done in Unity. Since it'll be these four objects in the scene with nothing else, it's a good simple start. I'll get the hang of importing, set up lights, etc. I think I'm going to add a chunk of ground for the objects to sit on as well. It'll be a big chunk of some really roughed up pavement to help make the screenshots look more interesting than just putting the objects on a flat gray background.

Right now, I'm getting started on the Zbrushing. More pics to come.

Monday, January 2, 2012

Tweaking That Stuff

So I took some advice into consideration and made some changes to the deco environment.

These include:

1) Added more contrast to the skybox.
2) Tweaked the cubemap reflection so that there's less white.
3) Upped the contrast in the lighting so that shadows are more noticeable as well as highlights.
4) Added some curtains for the windows.
5) Made the horizon line higher and added water to add interest.


Let me know what y'all think! ;)

Sunday, January 1, 2012

Deco for the New Year

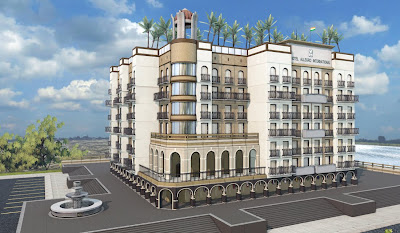
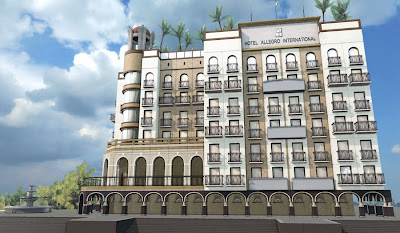
It's been awhile, hasn't it? Things have been beyond hectic for me throughout the holidays, so this post is coming a little later than I would have liked. But I'll get to the actual point of showing you all what I have on the Miami Deco environment, and save the personal stuff for later. In a word, its' done! Well, for now. Once I get some feedback, I'm sure I'll make changes. It's definitely close though.

Here it be:


Now that I look at the last post, it's amazing how different it looks. Polish goes a long way, eh? I really focused a lot on lighting this time around. I originally had a simple directional light set up to represent the sun, but it wasn't getting me the results I wanted. It still looked
very flat to me. Instead, with the advice of someone well versed in lighting levels, I used a 3 point lighting setup. A key light, back light, and fill light. 3 directional lights all with different intensities and color tinting. Other than that, nothing really changed from my last post other than using those purple arches all around the bottom. It just seemed better than breaking it up with two different arch models. The switch from one to another was too abrupt and just looked awkward. I also increased the amount of palm trees for added visual interest and added in the cubemapping to the windows for a nice reflection.

The only main thing I have to do as far as touch up goes is remove all the seams between pieces in photoshop. It pains me to do it post engine, but I (as well as everyone else that's experienced this problem on the internet) couldn't figure out how get rid of them. Apparently, it's a limitation with UDK. Kinda crappy. Next time, I'll have to design around it.

As I mentioned earlier, lots of craziness over the past two months. The usual holdiay hoopla, combined with longer hours at work. And oh yeah, my computer died. As I said earlier, I had plans to buy a new one already in motion. But I decided to wait until Cyber Monday to get one at a cheaper price. So a few weeks before that, it died. Literally two weeks before getting a new one. After having it for 6 years. O_o

So now I make any needed changes to this project. After that, I'll be going through tutorials on how to use Unity and I'll also be brushing up on some of the programs I already know. Speaking of which, that's what I'm gonna be using for my next project. I think it's just gonna be some urban prop work. I don't really have any individual props in the portfolio, so I'm thinking that's the next logical step. I'm not sure how fast it'll get done though, as we might be ramping up on that indie project I mentioned earlier. It all depends on how that goes.

I'm also thinking about branching out from just doing game environments for the sake of making myself more well rounded for the dried-up job market I'm facing right now. Just limiting myself to games isn't the best idea with all the studio closings and layoffs I've seen as of late. Which of course makes it even harder than it already is to break in. Such is life for an aspiring dev.

I guess we'll just see........ :D