That's right. After a year long journey with many bumps along the way, at long last my demo reel is DONE. It's hard to believe that it's been almost a year since I set out to get this done. Unbelievable. I must say that there's no way I could have done this without the support of my friends and family. In times where I got so frustrated that quitting seemed like the only option, they helped motivate me to pick myself back up, and I am extremely blessed for that. So, here it is.
All I have to do before Chicago now is put up the website, so look out for that sometime this month.
Cheers to progress!
EDIT: It appears that blogger hates my video and cuts off a part of it when I try embedding it, so here's a link: http://www.youtube.com/watch?v=mfThYDJJ3Cg
Make sure you watch it in 480P. Otherwise, it looks like crap. Hehe :P

Monday, August 9, 2010

Saturday, August 7, 2010
The Desert Sessions, PT. 9
 It's done! That's right, after 6 months of solid labor, Desert Straggler is complete! I've got tons of pics to show, and I must say that this is by far the best thing I've done so far. Considering that I just started learning the Unreal engine about a year ago, I'm happy with how much I've learned since then. There's still some ways to go, but I'm anxious to see what future projects will bring. A list of things new in this final version:
1) Shack is done. No more boring-looking flat, purple and gray boxes.
2) Plane is done.
3) Tire prop is complete.
4) Ambient occlusion effect is working nicely for the outside, while the interior has very little, which looks best.
5) Water bottle shader is complete.
Enough talk. Onto the pics now:


 So the biggest part of the update, the shack. It's actually made up of several props. I tried to keep the colors under wraps, with mostly reds, and greens without making it look too uniform. After all, it is made of what this guy can actually find and stick together. If you looks closely at some of the pics, you can tell that everything is held together by nails. Makes enough sense to appease the general player. I drew influence from a bunch of pictures of makeshift shacks and tents and pieced together parts from each one to form the final shack you see. As I said, my concept artist crapped out on me, so the concept is entirely my own. I didn't think I had it in me, but I'm rather proud of myself on that one. It was tricky figuring out how the shack's tarp would be held up, but reference of tents being held up by long sticks with rope sold me on how to achieve believable results. I'm also happy with how the floor blanket turned out. The dirt around the edges and over it really makes it look worn and dirty. As for the overall wall structure, it's made up of three components: wood, corrugated steel, and cloth. Not too many different things to confuse the player, but enough variety to be visually pleasing.
 The plane was a lot of work. It was really tricky to get the proportions right, as I'm sure there are plenty of airplane experts out there that need to be convinced. I chose blue as a way of making it pop out of the environment, as the red-orange sand and green flora match each other. In contrast, blue stands out more. The color map is entirely hand painted, and is perhaps one of the best I've painted to date. I didn't want it to look too destroyed, as you have to believe that the guy stranded here could actually survive it, even though his friend had no such luck. Good reference was perhaps the hardest to find for the plane, especially in a wrecked state, and I drew influence from multiple pics. I like the result.
Oh yeah, and here's the maps for it:
 Diffuse
 Specular
 Normal
The rest of the pics are things you have already seen, but enjoy nonetheless:


 Fun facts about Desert Straggler, which has:
87 diffuse maps
43 normal maps
26 specular maps
(That's 156 maps in total, if you like math)
114 props
87 materials
Alright then! What's the plan now? I'm going to finish the demo reel, of course. I need to optimize the level more, so the engine keeps a decent framerate, set up camera work, capture the video, make the wireframe shots, and edit it all together. From there, I give all of that stuff to my new website maker lady, Whitney Martin, whom I'm sure will do a fantastic job. When the demo reel is done, I'll make another post. Same thing with the website. So close to having this portfolio thing done.........
Thursday, July 15, 2010
The Desert Sessions, PT. 8
Well now, it looks like there is a light at the end of this tunnel. Everything is done for the desert level, except for the shack and plane. Like I said, they're the two hardest props to make, so I'm unsure of how long it'll take to get them done. I'll be handling them as far as concept goes, so I'll be diving right into it tonight. The truth of the matter is that the shack will consist of multiple meshes that are all put together, but I'll speak of it as one for clarity sakes. All my reference is ready to go, and it's one last push until this thing is finally done.
I'm optimistic that my demo reel will be done by mid August, just in time for the move to Chicago. Speaking of that, there's an official date set: August 22nd. Words cannot express how excited I am. The actual editing of all the video, titles, music, everything is ready to go. I decided to get it all done one weekend to kind of break up the monotony of zbrushing and texturing. I literally just have to make some video of the desert and plop it right on in. I'll also be fixing some image issues in the website with Harlow, and I might also make some behind the scenes pics to show my process. But for now, here's what I gots:
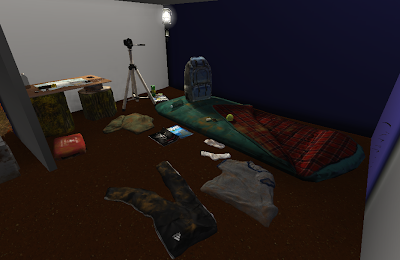
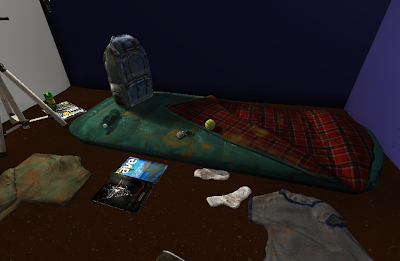
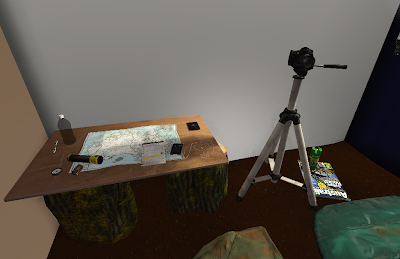 I made a bunch of improvements to the interior of the shack as you can see. I fixed some issues with parts of my normal maps fading out where light hits them. I Made a grayscale copy of their normal maps' green channel, and overlayed them over the rest of the diffuse layers. It seems like a hack, but since none of my lights are dynamic, there's really no difference to be seen except for just having more detail in general. The backpack, sleeping bag, and table logs benefited a lot from this. I also played with the specular power of some objects, which gives them a more realistic look as far as specularity goes. The plastic bottles need to be fixed material wise, but once everything around it is done, I can capture the reflection map which will make it look a lot better. I also got rid of a weird occlusion issue with certain objects, mainly the table and tripod. They were casting a weird artifact around them, but messing with some world properties straightened them out. I dirtied everything up as well, since I'm sure whoever lives there would track some dirt in there. The t shirt now has some better color choice, as does the flashlight. And most noticeable of all are the log stumps holding up the makeshift table. Pretty much everything on those are new. They were pretty bare looking until I decided some moss would look nice. Imagine them without any green. Dull, right?
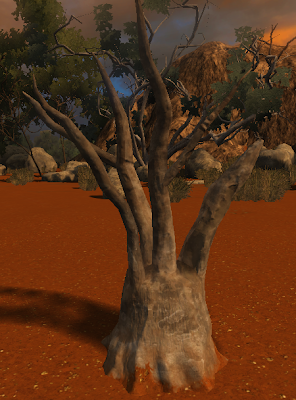 Next up is that stump thing that looked pretty bad without any texture work done to it. It has a pretty subtle texture to it, but it works. I added some sand to the bottom to make it blend in more with the ground. It looked pretty poor without it.
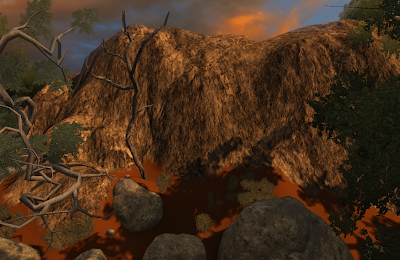
And here arethe mountains, which are improved. The old texture for it looked pretty bad, so I redid it. It uses one texture twice, one that's really big for viewing the mountain from far away, and another that tiles smaller for close up viewing. This helps break up obvious repetition of the textures, no matter what distance you're viewing it from. As you can also see, the dead tree is done. Nothing flashy here, once again subtlety works.
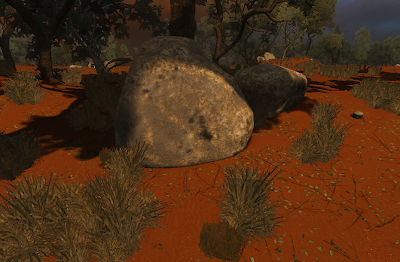 As one guy suggested on Polycount, I added some leaves and increased the amount of twigs. Finding a right amount of saturation for the leaves was tricky, as I didn't want them to look too fresh, but too much desaturation prevents them from blending in properly with everything else.
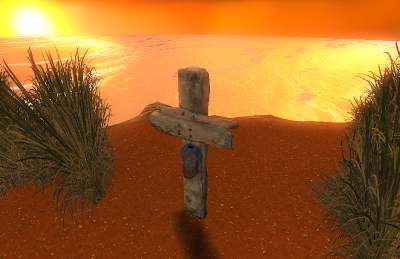 Ah yes, the grave. It was pretty simple to do. I modeled it after some reference of an old wooden sign and it has just the right amount of dirt and detail. It was tough to conceptualize how some wood carved for such a purpose would look, since he wouldn't have the best tools, but once I settled on something, it was smooth sailing.
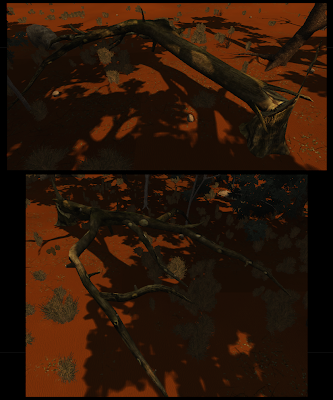
It's mostly in shadow, but the "fallen tree" as I've called it helps to break up the environment a bit. Zbrushed all to hell, this guy is pretty light at about 2000 tris. I'm pretty happy with how detailed it ended up looking.
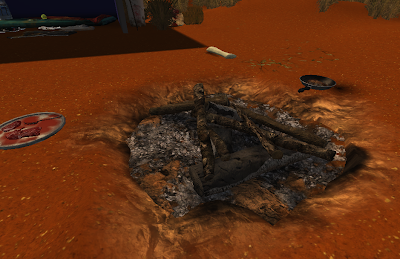 And finally, I added in that campfire area I mentioned in earlier posts. This was a bitch to do in zbrush, as I had quite a few sticks to do, and I was being a stickler on all the detail. Maybe too much for how close you get to it. Out of all the things I zbrushed, this along with the fallen tree took the most time to sculpt. I dug into the terrain a bit and put down a flat plane that would serve as the ash beneath the logs. This is definitely one of the props I'm most proud of.
That's all for this update. I've promised myself that there will only be one more final update for the desert sessions. I just really want to get this thing and looking nice. Once it is, and the website/demo reel is done, a gigantic weight will be off of my shoulders. Stay tuned...
I'm optimistic that my demo reel will be done by mid August, just in time for the move to Chicago. Speaking of that, there's an official date set: August 22nd. Words cannot express how excited I am. The actual editing of all the video, titles, music, everything is ready to go. I decided to get it all done one weekend to kind of break up the monotony of zbrushing and texturing. I literally just have to make some video of the desert and plop it right on in. I'll also be fixing some image issues in the website with Harlow, and I might also make some behind the scenes pics to show my process. But for now, here's what I gots:


 I made a bunch of improvements to the interior of the shack as you can see. I fixed some issues with parts of my normal maps fading out where light hits them. I Made a grayscale copy of their normal maps' green channel, and overlayed them over the rest of the diffuse layers. It seems like a hack, but since none of my lights are dynamic, there's really no difference to be seen except for just having more detail in general. The backpack, sleeping bag, and table logs benefited a lot from this. I also played with the specular power of some objects, which gives them a more realistic look as far as specularity goes. The plastic bottles need to be fixed material wise, but once everything around it is done, I can capture the reflection map which will make it look a lot better. I also got rid of a weird occlusion issue with certain objects, mainly the table and tripod. They were casting a weird artifact around them, but messing with some world properties straightened them out. I dirtied everything up as well, since I'm sure whoever lives there would track some dirt in there. The t shirt now has some better color choice, as does the flashlight. And most noticeable of all are the log stumps holding up the makeshift table. Pretty much everything on those are new. They were pretty bare looking until I decided some moss would look nice. Imagine them without any green. Dull, right?
  Next up is that stump thing that looked pretty bad without any texture work done to it. It has a pretty subtle texture to it, but it works. I added some sand to the bottom to make it blend in more with the ground. It looked pretty poor without it.
And here arethe mountains, which are improved. The old texture for it looked pretty bad, so I redid it. It uses one texture twice, one that's really big for viewing the mountain from far away, and another that tiles smaller for close up viewing. This helps break up obvious repetition of the textures, no matter what distance you're viewing it from. As you can also see, the dead tree is done. Nothing flashy here, once again subtlety works.
 As one guy suggested on Polycount, I added some leaves and increased the amount of twigs. Finding a right amount of saturation for the leaves was tricky, as I didn't want them to look too fresh, but too much desaturation prevents them from blending in properly with everything else.
 Ah yes, the grave. It was pretty simple to do. I modeled it after some reference of an old wooden sign and it has just the right amount of dirt and detail. It was tough to conceptualize how some wood carved for such a purpose would look, since he wouldn't have the best tools, but once I settled on something, it was smooth sailing.
It's mostly in shadow, but the "fallen tree" as I've called it helps to break up the environment a bit. Zbrushed all to hell, this guy is pretty light at about 2000 tris. I'm pretty happy with how detailed it ended up looking.
 And finally, I added in that campfire area I mentioned in earlier posts. This was a bitch to do in zbrush, as I had quite a few sticks to do, and I was being a stickler on all the detail. Maybe too much for how close you get to it. Out of all the things I zbrushed, this along with the fallen tree took the most time to sculpt. I dug into the terrain a bit and put down a flat plane that would serve as the ash beneath the logs. This is definitely one of the props I'm most proud of.
That's all for this update. I've promised myself that there will only be one more final update for the desert sessions. I just really want to get this thing and looking nice. Once it is, and the website/demo reel is done, a gigantic weight will be off of my shoulders. Stay tuned...
Thursday, June 17, 2010
The Desert Sessions, PT. 7
So this is q really quick post, mainly because I just made a really quick fix. Some folks on the Poly count forums recommended that I take the red hue on the sand down a notch, so I did, and it looks much, much better. The plants don't stick out so much now. I also toned down the green on the trees as well, and shifted them towards a more yellow-greenish hue.


Wednesday, June 16, 2010
The Desert Sessions, PT. 6
All the organic stuff in my environment is done! I replaced the expensive plant meshes I once had that had each individual leaf as a mesh, and replaced them with transparent plane geometry that takes each plant from 1,000 polys to about 10. HUGE difference, needless to say. So now, I don't have to skimp on the amount of shrubbery the level has. The planes cross each other in just the right fashion to make the grass believable from virtually any angle.
 I also added some bushes in, which are not as abundant as the previously mentioned plants. They serve as a sort of "accent" mesh to add visual variety. Same idea as the other plants in construction, just a different plant image used.
 Another big change is all the rocks that I added in. I modeled them out in maya, detailed them in zbrush, and painted them in photoshop. It was tricky getting the colors for them to match in with the environment just right, but a neutral gray with a touch of earth tone works just right. I tried more chromatic orange colors like I observed in many reference pics, but they ended up sticking out like a sore thumb. The poly count of each rock is roughly 600-700 polys, which I'm happy with, given how their silhouettes look.
 The last thing I did was fill in the open background area past the point where the player can go. Trees, rocks, grass, it's all there. The magic in it is that they are all flat image planes. Since they are far away, there's no need for them to be complex models, so I faked it by taking a screen cap of the actual 3D models, erasing the surrounding backgrounds in Photoshop, and including an alpha in the TGA. It looks convincing, and it made virtually no mark on my poly count. It's nice to see my map really finally feel like it's part of something bigger, like it's never ending.
 So, now that the natural stuff is done, save some unique trees that are static meshes, I can move on to finishing some remaining models. After that, it's time to visit the material editor and make some of my objects look a bit shinier. And after that, I finally tackle the plane and shack.
More to come....
 I also added some bushes in, which are not as abundant as the previously mentioned plants. They serve as a sort of "accent" mesh to add visual variety. Same idea as the other plants in construction, just a different plant image used.
 Another big change is all the rocks that I added in. I modeled them out in maya, detailed them in zbrush, and painted them in photoshop. It was tricky getting the colors for them to match in with the environment just right, but a neutral gray with a touch of earth tone works just right. I tried more chromatic orange colors like I observed in many reference pics, but they ended up sticking out like a sore thumb. The poly count of each rock is roughly 600-700 polys, which I'm happy with, given how their silhouettes look.
  The last thing I did was fill in the open background area past the point where the player can go. Trees, rocks, grass, it's all there. The magic in it is that they are all flat image planes. Since they are far away, there's no need for them to be complex models, so I faked it by taking a screen cap of the actual 3D models, erasing the surrounding backgrounds in Photoshop, and including an alpha in the TGA. It looks convincing, and it made virtually no mark on my poly count. It's nice to see my map really finally feel like it's part of something bigger, like it's never ending.
 So, now that the natural stuff is done, save some unique trees that are static meshes, I can move on to finishing some remaining models. After that, it's time to visit the material editor and make some of my objects look a bit shinier. And after that, I finally tackle the plane and shack.
More to come....
Sunday, May 23, 2010
The Desert Sessions, PT. 5
It's about due time for an update. There's been quite a lot of progress since the last post, mainly in the the fact that there's trees now populating the map. List of new things....GO
1) Added 12 different types of speedtrees to the map. Most are populated with leaves, some are bare. Used 3 different leaf textures, and 3 bark textures. Bark textures have normal maps as well.
2) Map now uses motion blur for the player.
3) Depth of field is now enabled. Objects in the background look out of focus.
4) Changed the water to reflect the skydome texture. The way it's lit looks more spot on with the surrounding environment.
5) Added grass clumps. The ones seen are placeholders. More on that later...
6) Finished sculpting mountains. It blends between two textures and has a normal map applied.
7) All props are now in place and scene layout is finalized.
8) Background land plane is in place.
9) Terrain layers are finalized, all with normal maps in place. Let's just say that the ground is done.
10) Added the post process volume, a sort of controller for the shadows, midtones, highlights, etc. in the scene.
11) Added a lightmass importance volume to speed up build time.
And the images as proof of my labours:


So. What to say.... Well, for starters, half of my time has been devoted to making it so that the frame rate stays at 24 fps. The big culprit was the grass clumps. I apparently overestimated what the unreal engine can handle as far as poly counts go. So, I spent a lot of time reducing the polys on all the models, only to find out that I have to completely remodel them in a new way. Back to square one. Live and learn. It's okay though, because it was a huge learning experience on engine optimization. I even tried to add in some tall grass, but the engine wasn't having that either. Don't know HOW I'll figure that one out.
There's also been some back and forth on making the trees look decent. Speedtree gives you quick results, it's just that the results can be unpredictable, and the amount of value sliders can give you a headache. Poly counts had to be adjusted, limbs cut, roots placed in at the last minute, the list goes on. For the amount of time spent on them, I like how they turned out. I would have liked to have had more of them, but Unreal craps itself when a certain amount of speedtrees are present. Another lesson to be had, this time in conservation.
I tried to get some subtle fog going in the scene, but the engine can only do height based fog and not distance-based. The depth of field effect replaced it, and I must say it looks better than what fog could have given me. It also had the bonus of making my sun look like it's glowing which is nice. The water got blurred a bit more than I would like, but there was no way around it. Still, it doesn't look too bad.
The post process volume I added in also gave me the control I needed to make the shadows darker, to reflect more realistic sunset lighting.
The terrain itself was a bitch and a half. It's pretty complex right now with different texture layers, height restrictions, yadda yadda, but it's looking good. It takes so long to save any material connected to it, that I literally will go and take a shower, brush my teeth, and it will ALMOST be done when I come back. No exaggeration there. It's almost as long as my build time, which is at a cozy 20 minutes. Not bad, i say.
Things to come:
1) Bryan is finishing up the concept sketches. I'll post em', probably over the next few days.
2) Rocks need to be added. Will probably have 5 models total, all zbrushed with super detailed goodness. I originally wasn't going to have any, as I didn't see any in the reference pics I have, but Bryan's concept sketch of the overall environment told me otherwise. Thank you Bryan.
3) Foliage needs some closure. Need to find a low poly solution for bushes, tall grass, and grass clumps. That will take some experimentation, as well as time.
4) Need to make background cards for trees, rocks, etc. Flat 2D planes in the distance that give the illusion of stuff in the background.
5) Remaining prop work: Plane, shack, grave, fallen tree, tree stump, dead tree, table stump. More stuff than I would like to admit. That's the bulk of my remaining time.
6) Make a final material pass on all things in the scene. I learned a lot about materials as of late, and still have yet to fully apply that knowledge to the scene. The water bottle sticks out the most in my mind.....
*Shoooooo. That's a lot off my chest. For now. I really have to kick some ass to get all of my portfolio stuff done by August, which is when Joe and I are moving to Chi-town. And yes, we ARE moving then. No more holding off :P. Words can't express how nervous I am about getting this all done. June is a busy month for me, as work will be hectic due to many new, busy movies coming out, as well as the fact that we'll be getting 3D movies at my theater. We will literally be blowing up. It's intense. Also then is the final trip Joe and I will be making to Chicago to look for apartments. On top of all that, I will be gracing Lexington, Kentucky with my presence this Wednesday and Thursday. I am VERY excite. Good people there, I say.
Oh and before I forget, Ross contacted me and asked me to make him a model for an upcoming episode of Civil Protection. Said model was completed today, and now he has a guy that can compile my models, so we're in business again. I'll make a post about the episode when it comes out, no doubt.
1) Added 12 different types of speedtrees to the map. Most are populated with leaves, some are bare. Used 3 different leaf textures, and 3 bark textures. Bark textures have normal maps as well.
2) Map now uses motion blur for the player.
3) Depth of field is now enabled. Objects in the background look out of focus.
4) Changed the water to reflect the skydome texture. The way it's lit looks more spot on with the surrounding environment.
5) Added grass clumps. The ones seen are placeholders. More on that later...
6) Finished sculpting mountains. It blends between two textures and has a normal map applied.
7) All props are now in place and scene layout is finalized.
8) Background land plane is in place.
9) Terrain layers are finalized, all with normal maps in place. Let's just say that the ground is done.
10) Added the post process volume, a sort of controller for the shadows, midtones, highlights, etc. in the scene.
11) Added a lightmass importance volume to speed up build time.
And the images as proof of my labours:


So. What to say.... Well, for starters, half of my time has been devoted to making it so that the frame rate stays at 24 fps. The big culprit was the grass clumps. I apparently overestimated what the unreal engine can handle as far as poly counts go. So, I spent a lot of time reducing the polys on all the models, only to find out that I have to completely remodel them in a new way. Back to square one. Live and learn. It's okay though, because it was a huge learning experience on engine optimization. I even tried to add in some tall grass, but the engine wasn't having that either. Don't know HOW I'll figure that one out.
There's also been some back and forth on making the trees look decent. Speedtree gives you quick results, it's just that the results can be unpredictable, and the amount of value sliders can give you a headache. Poly counts had to be adjusted, limbs cut, roots placed in at the last minute, the list goes on. For the amount of time spent on them, I like how they turned out. I would have liked to have had more of them, but Unreal craps itself when a certain amount of speedtrees are present. Another lesson to be had, this time in conservation.
I tried to get some subtle fog going in the scene, but the engine can only do height based fog and not distance-based. The depth of field effect replaced it, and I must say it looks better than what fog could have given me. It also had the bonus of making my sun look like it's glowing which is nice. The water got blurred a bit more than I would like, but there was no way around it. Still, it doesn't look too bad.
The post process volume I added in also gave me the control I needed to make the shadows darker, to reflect more realistic sunset lighting.
The terrain itself was a bitch and a half. It's pretty complex right now with different texture layers, height restrictions, yadda yadda, but it's looking good. It takes so long to save any material connected to it, that I literally will go and take a shower, brush my teeth, and it will ALMOST be done when I come back. No exaggeration there. It's almost as long as my build time, which is at a cozy 20 minutes. Not bad, i say.
Things to come:
1) Bryan is finishing up the concept sketches. I'll post em', probably over the next few days.
2) Rocks need to be added. Will probably have 5 models total, all zbrushed with super detailed goodness. I originally wasn't going to have any, as I didn't see any in the reference pics I have, but Bryan's concept sketch of the overall environment told me otherwise. Thank you Bryan.
3) Foliage needs some closure. Need to find a low poly solution for bushes, tall grass, and grass clumps. That will take some experimentation, as well as time.
4) Need to make background cards for trees, rocks, etc. Flat 2D planes in the distance that give the illusion of stuff in the background.
5) Remaining prop work: Plane, shack, grave, fallen tree, tree stump, dead tree, table stump. More stuff than I would like to admit. That's the bulk of my remaining time.
6) Make a final material pass on all things in the scene. I learned a lot about materials as of late, and still have yet to fully apply that knowledge to the scene. The water bottle sticks out the most in my mind.....
*Shoooooo. That's a lot off my chest. For now. I really have to kick some ass to get all of my portfolio stuff done by August, which is when Joe and I are moving to Chi-town. And yes, we ARE moving then. No more holding off :P. Words can't express how nervous I am about getting this all done. June is a busy month for me, as work will be hectic due to many new, busy movies coming out, as well as the fact that we'll be getting 3D movies at my theater. We will literally be blowing up. It's intense. Also then is the final trip Joe and I will be making to Chicago to look for apartments. On top of all that, I will be gracing Lexington, Kentucky with my presence this Wednesday and Thursday. I am VERY excite. Good people there, I say.
Oh and before I forget, Ross contacted me and asked me to make him a model for an upcoming episode of Civil Protection. Said model was completed today, and now he has a guy that can compile my models, so we're in business again. I'll make a post about the episode when it comes out, no doubt.
Monday, April 26, 2010
The Desert Sessions, PT. 5
 Greetings y'all. So I've gotten a bit side tracked by some happenings in my life, but I'm still plugging away. I just finished sculpting out the majority of the terrain, and next is texturing it. UDK has a pretty nifty way of blending between textures based on the height of the terrain that I'm using. I have it set up so that on flat surfaces you have some flat sand with some rocks here and there, raised surfaces have a more bumpy feel to the sand, and the cliff side that overlooks the sea has its own rocky texture. The game engine automatically calculates which texture to show based on height, and I just have to sculpt it out and play with the numerous settings. Another cool feature that UDK terrain has is the ability to simplify its geometry based on the player's view. If the player is right next to a hill for example, they see the high detailed version of it. But, as they walk further away from it, it loses more and more polygons until it's at its lowest poly version. Definitely saves ALOT of processing power, and allows me to make a higher res landscape, so that's awesome. As for all the little dots on the cliff, I'm not sure. I'm sure I'll find some way to troubleshoot it.


 Another thing you'll notice is that the water is done. I followed a tutorial on www.hourences.com (if you mod with UDK, check it out, it's an EXTREMELY useful site) , that was very useful in teaching me how to make water look realistic without making the shader itself too complex. I'll no doubt change some stuff about it, like making the reflection of the sun more accurate. But, I'm very, very happy with how it turned out. Which reminds me, another reason why I haven't had too much to show lately is that I decided to take a week to get really in depth with unreal editor's material system. I feel like I can make my objects look ten times more realistic as a result. It'll be the last thing I do to the desert, sort of the icing on the cake if you will.
I also fixed the skybox up a bit, textured some more objects, and I also have some concept work coming in from Bryan. So far it's just one pic showing the overall "feel" of the level, and he's currently working on pics of the shack, plane and rock formation. Here's a little taste:

Pretty sweet, eh? So what now? I finish texturing the terrain, then I place the trees, then some rocks, and then make the crashed plane, shack, and rock formation. I'm sure there will be things in between that come up unexpectedly, but whatever. That's the joy of making game art. :)
Subscribe to:
Posts (Atom)