 Also, for those who are wondering about Civil Protection, you are not alone. I emailed Scott Ross and haven't gotten a response. Basically, since I don't know how to get my models into the Source engine, I can't make stuff for him unless he finds someone who can help us with compiling them. I've been down that road before with no success, so there's not a lot I can do. He's a busy guy, so I'm not sure when he'll get back to me IF he does, that is. So it's hard to tell what will happen with that.

Tuesday, October 27, 2009
UV Layout
As promised, here is the UV setup for the laser rifle. Extremely boring to those who don't know what it is or what it does. Now I'm all set to start on my first ever Zbrush normal map! I'm not sure how long this will take as it's like I said, the first one I've done. Hopefully it won't take longer than two weeks.
 Also, for those who are wondering about Civil Protection, you are not alone. I emailed Scott Ross and haven't gotten a response. Basically, since I don't know how to get my models into the Source engine, I can't make stuff for him unless he finds someone who can help us with compiling them. I've been down that road before with no success, so there's not a lot I can do. He's a busy guy, so I'm not sure when he'll get back to me IF he does, that is. So it's hard to tell what will happen with that.
Also, for those who are wondering about Civil Protection, you are not alone. I emailed Scott Ross and haven't gotten a response. Basically, since I don't know how to get my models into the Source engine, I can't make stuff for him unless he finds someone who can help us with compiling them. I've been down that road before with no success, so there's not a lot I can do. He's a busy guy, so I'm not sure when he'll get back to me IF he does, that is. So it's hard to tell what will happen with that.

Monday, October 26, 2009
Laser Rifle Modeling
Well now, here it is. The actual geometry for the rifle is done. I'm really happy with the way this has turned out so far, as I'm usually a little unsatisfied with my models until the normal mapping is applied. So, I'm excited to see how much better it will look with it on. Deciding what the poly count was going to be was a bit tricky, as weapons have a different philosophy to them than the regular props I usually do. There are usually three models used for a single weapon:
1) For the first person view, a higher poly model to hold up at a close distance.
2) The model that you see other players holding, which is about mid poly range. Some games will switch it to a lower poly mesh when it reaches a certain distance from you.
3)A pickup gun mesh. You know, the one that floats around or sits on the ground for you to pick up. Usually also a mid poly mesh.
So that's the dilemma. Which do I do?
I decided to do the mid poly version, because it seems like a good compromise. Doing something too high poly might make it look like I can't conserve geometry, and a low poly version for far away distances makes it look like I can't model in a complex manner.
Once I decided to go with that, I needed an example to follow from some game. I chose Team Fortress 2, because its model viewer lets you see the exact geometry display and count. I looked for a weapon similar in complexity and found that it was twice as many polys as I had on the rifle. TF2 models are usually very low poly with it being an online only game, so my model looked extremely well budgeted. I added some geo here and there, and came to a good looking model that conserved polys where it needed to.


 So now, I layout the uv's, make the zbrush model, apply it as a normal map, paint the color map, and then finally the specular map. Easy right? :P
I'll update next with the finished uv layout, which will hopefully be tomorrow. After that, it'll be the normal mapped model alongside the mid geo model with the normal map applied. That will be sometime in early November if all goes to plan.
1) For the first person view, a higher poly model to hold up at a close distance.
2) The model that you see other players holding, which is about mid poly range. Some games will switch it to a lower poly mesh when it reaches a certain distance from you.
3)A pickup gun mesh. You know, the one that floats around or sits on the ground for you to pick up. Usually also a mid poly mesh.
So that's the dilemma. Which do I do?
I decided to do the mid poly version, because it seems like a good compromise. Doing something too high poly might make it look like I can't conserve geometry, and a low poly version for far away distances makes it look like I can't model in a complex manner.
Once I decided to go with that, I needed an example to follow from some game. I chose Team Fortress 2, because its model viewer lets you see the exact geometry display and count. I looked for a weapon similar in complexity and found that it was twice as many polys as I had on the rifle. TF2 models are usually very low poly with it being an online only game, so my model looked extremely well budgeted. I added some geo here and there, and came to a good looking model that conserved polys where it needed to.


 So now, I layout the uv's, make the zbrush model, apply it as a normal map, paint the color map, and then finally the specular map. Easy right? :P
I'll update next with the finished uv layout, which will hopefully be tomorrow. After that, it'll be the normal mapped model alongside the mid geo model with the normal map applied. That will be sometime in early November if all goes to plan.
Monday, October 12, 2009
Chernobyl is Complete!!!
Hello all, that's right! It's done. It feels really good to have something finished that wasn't either A) Rushed too much for a school deadline, or B) Incomplete due to technical issues. The normal mapping and lighting gave me some troubles, but specular mapping was a breeze. I couldn't use Zbrush to sculpt out normal maps for this project due to me not realizing that you can't do some stuff in Photoshop and some in Zbrush. Apparently, when you make a model, its entire texture has to done in one program. Which is fine, that's what this next project is about (More on that later). The book I bought helped a little bit with the lighting, but not as much as I had hoped. Mainly, I just figured it out on my own. Lighting and the way normal maps react to it is still a little shaky with me, but oh well. You can't get everything right away. Anyway, here it is folks:
 Sorry about the text and player model on screen once again. I will have this cut out of the version for the demo reel. Also, anti aliasing (jagged edges) are still present, which hopefully will be straightened out for the reel as well. I went online to figure out a way to remedy it, but everybody says that anti aliasing hasn't been fixed for unreal 3. I find this hard to believe. One way or another, this will be fixed, I assure you.


Now this project is done for now, but there will probably be changes for the demo reel version. There is one object in particular that might be changed, but I'm curious if someone will notice it, so I'm keeping my mouth shut about it. Two big changes that you will probably notice are the metal piece added onto the middle of the medical lamp, and the broken glass on the window. Just little things to give it more completion.
The final product will be pretty much the same as I originally planned, with a little bit of difference:
1) A moving shot from left to right of the objects, framed similar to these pics.
2)Still shot of the left side, showing a progression of the different layers. In order of final, model and lighting only view, polycount and wireframe view, color map view, normal map view, specular map view, and a shot of the final product again.
3) The same as #2, but it's the pic of the right side of the room.
The second shot I planned out in the very beginning, I decided was unnecessary. You only need one shot to establish the room I feel. So, that's that.............NEXT!
 BAM! That's the gun I will be making, courtesy of the tasty rendering you see by my good pal, Jake Rynkiewicz. Over the next week, I'm gonna take it easy to celebrate Chernobyl's completion. But I'll also be planning for this one. Expect to see some stuff by the beginning of November-ish. The finalized version of this will be a turntable that rotates the object and shows the different layers of detail applied to the model. I'm going to try to make it a ZBrush only model, so we'll see how that goes. I'm going to do some online tutoring on making geometric detail on objects in ZBrush. Basically, this guy I met on a forum says he'll make a 60 minute training DVD for anyone who wants to get better with it, and it will be completely custom made to suit my learning needs. He also seems to be very professional and legit, which is a plus. Very cool stuff. He says that he'll also give homework assignments to make sure it all sinks in, so I might have that to show even before the gun. Time will tell. Now, for some well earned celebration Chipolte.
NOM NOM NOM NOM NOM!
 Sorry about the text and player model on screen once again. I will have this cut out of the version for the demo reel. Also, anti aliasing (jagged edges) are still present, which hopefully will be straightened out for the reel as well. I went online to figure out a way to remedy it, but everybody says that anti aliasing hasn't been fixed for unreal 3. I find this hard to believe. One way or another, this will be fixed, I assure you.

Now this project is done for now, but there will probably be changes for the demo reel version. There is one object in particular that might be changed, but I'm curious if someone will notice it, so I'm keeping my mouth shut about it. Two big changes that you will probably notice are the metal piece added onto the middle of the medical lamp, and the broken glass on the window. Just little things to give it more completion.
The final product will be pretty much the same as I originally planned, with a little bit of difference:
1) A moving shot from left to right of the objects, framed similar to these pics.
2)Still shot of the left side, showing a progression of the different layers. In order of final, model and lighting only view, polycount and wireframe view, color map view, normal map view, specular map view, and a shot of the final product again.
3) The same as #2, but it's the pic of the right side of the room.
The second shot I planned out in the very beginning, I decided was unnecessary. You only need one shot to establish the room I feel. So, that's that.............NEXT!
 BAM! That's the gun I will be making, courtesy of the tasty rendering you see by my good pal, Jake Rynkiewicz. Over the next week, I'm gonna take it easy to celebrate Chernobyl's completion. But I'll also be planning for this one. Expect to see some stuff by the beginning of November-ish. The finalized version of this will be a turntable that rotates the object and shows the different layers of detail applied to the model. I'm going to try to make it a ZBrush only model, so we'll see how that goes. I'm going to do some online tutoring on making geometric detail on objects in ZBrush. Basically, this guy I met on a forum says he'll make a 60 minute training DVD for anyone who wants to get better with it, and it will be completely custom made to suit my learning needs. He also seems to be very professional and legit, which is a plus. Very cool stuff. He says that he'll also give homework assignments to make sure it all sinks in, so I might have that to show even before the gun. Time will tell. Now, for some well earned celebration Chipolte.
NOM NOM NOM NOM NOM!
Tuesday, September 29, 2009
Color mapping is done!
So, I just finally hit that huge milestone where the diffuse color is done for everything. Now, I just need to learn a bunch about lighting in Unreal(Where are you, book?), and then apply the normal and specular maps. Here is the pic that I've been waiting to post for quite awhile, the finalized color mapping:
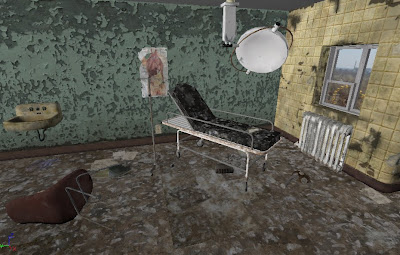
Things to excuse for now:
1) The lighting is crap. Hence, me waiting for that damn book thingy.
2) The anti-aliasing, or "jagged edges". This is a screen grab from the work window in the program. It's not from in-game. When everything is done, all the stuff you will see will be in game, complete with pretty, clean edges.
3) There are some objects that aren't technically done as far as color goes. These are special cases where the normal map needs to be completed first.
4) For those who nitpick like me, you can see a hard edge where the tiling is broken on the floor. I'm fairly certain that this is a lighting issue as well.
You may also notice that the Russian propaganda poster is gone. This is another example of having to let go of one of your babies that you love so much. Yes, I wasted a good day's worth of work to make it look good, but the medical poster you see in its place looks better. This change came about when I had my mom look at the room. This is what I like to do when I need that non-artist opinion on my work, which is just, if not more valuable. I told her to name what kind of building the room was in within 5 seconds, and she couldn't. This is a HUGE problem, because I want the viewer to know that they are in an abandoned hospital. She said that the propaganda poster looked out of place, and that they wouldn't have it in a hospital. This was something I knew before, but ignored as I thought that establishing the location as Russian was more important at the time. She suggested to replace it with a medical poster. DING DING DING DING! She had it. So I tried it, and it worked. It was that last piece needed to sell the place as a hospital. Hey, it was a bad feeling getting rid of the other, but nowhere near the feeling of abandoning CTF_Platform (the TF2 map).
So, right now I'm taking the time to relax and gather my sanity. After some Chipotle and Team Fortress 2, I'll resume work and update again whenever the lighting looks good along with the normal maps.

Things to excuse for now:
1) The lighting is crap. Hence, me waiting for that damn book thingy.
2) The anti-aliasing, or "jagged edges". This is a screen grab from the work window in the program. It's not from in-game. When everything is done, all the stuff you will see will be in game, complete with pretty, clean edges.
3) There are some objects that aren't technically done as far as color goes. These are special cases where the normal map needs to be completed first.
4) For those who nitpick like me, you can see a hard edge where the tiling is broken on the floor. I'm fairly certain that this is a lighting issue as well.
You may also notice that the Russian propaganda poster is gone. This is another example of having to let go of one of your babies that you love so much. Yes, I wasted a good day's worth of work to make it look good, but the medical poster you see in its place looks better. This change came about when I had my mom look at the room. This is what I like to do when I need that non-artist opinion on my work, which is just, if not more valuable. I told her to name what kind of building the room was in within 5 seconds, and she couldn't. This is a HUGE problem, because I want the viewer to know that they are in an abandoned hospital. She said that the propaganda poster looked out of place, and that they wouldn't have it in a hospital. This was something I knew before, but ignored as I thought that establishing the location as Russian was more important at the time. She suggested to replace it with a medical poster. DING DING DING DING! She had it. So I tried it, and it worked. It was that last piece needed to sell the place as a hospital. Hey, it was a bad feeling getting rid of the other, but nowhere near the feeling of abandoning CTF_Platform (the TF2 map).
So, right now I'm taking the time to relax and gather my sanity. After some Chipotle and Team Fortress 2, I'll resume work and update again whenever the lighting looks good along with the normal maps.
Friday, September 25, 2009
Greetings, comrade.
This post is just a couple snippits of what I've been doing over the past day or two. I've decided that online documentation regarding lighting in the Unreal level editor is pretty much nonexistent, minus just telling you how to place a light and adjust the brightness of it. So, I decided to buy a book on it. "Mastering Unreal Technology Volume 1", is its name, and it looks promising for 32.99. So, while I'm waiting on that to get here, I decided to finally crank out that Russian propaganda poster mentioned earlier. And I must say, I'm happy with it:
 What I basically did was make the poster as if it were brand new, and then roughed out the edges and added some dirt and paper overlays that gave it its worn out look. The original design:

(The writing is Russian for "nuclear power"). Creative, I know. Also, I added the transparency map to the window glass and placed an image behind it of the infamous abandoned ferris wheel found in Pripyat. (The city that had to be evacuated due to the Chernobyl disaster, where this scene is set).

This, along with the poster, hints at the setting without shoving it down the viewer's throat too much. I guess if you don't know by the title "Chernobyl" what it's about, then these won't matter. If you do however, it shows that I've done my homework. :D The tricky part of finding a good background image for the window was all in the perspective. It had to look as if you were seeing it by looking straight at the window, and also had to be something that gave you enough of a hint at the setting. If the angle of the image would be off even slightly, it would look weird as the camera pans right.
So, hopefully when I get my book, It'll help my lighting to not look like crap. Meanwhile, I'll be working on getting some random clutter on the ground, and finishing the color mapping. I'll have this whole thing done sometime in October. That's all I know for now.
 What I basically did was make the poster as if it were brand new, and then roughed out the edges and added some dirt and paper overlays that gave it its worn out look. The original design:
(The writing is Russian for "nuclear power"). Creative, I know. Also, I added the transparency map to the window glass and placed an image behind it of the infamous abandoned ferris wheel found in Pripyat. (The city that had to be evacuated due to the Chernobyl disaster, where this scene is set).

This, along with the poster, hints at the setting without shoving it down the viewer's throat too much. I guess if you don't know by the title "Chernobyl" what it's about, then these won't matter. If you do however, it shows that I've done my homework. :D The tricky part of finding a good background image for the window was all in the perspective. It had to look as if you were seeing it by looking straight at the window, and also had to be something that gave you enough of a hint at the setting. If the angle of the image would be off even slightly, it would look weird as the camera pans right.
So, hopefully when I get my book, It'll help my lighting to not look like crap. Meanwhile, I'll be working on getting some random clutter on the ground, and finishing the color mapping. I'll have this whole thing done sometime in October. That's all I know for now.
Sunday, September 13, 2009
Taking Shape
Hello all. Have you ever been in the early stages of a project and had those old, nagging thoughts that you have no idea what you're doing? Well, this is how almost all my projects go. Eventually though, I get to a point where all the pieces fall into place and I start to become happy with what I see. I have hit that point. Not to say that it's looking phenomenal yet or anything, but I think that the final product will be something to be proud of. I guess I'll shut up and show you what I mean:

As you can see, the color mapping for the room is complete. Now when I say room, that's not including any prop work, obviously. I like the way the whole color scheme is looking, as it is not too colorful for such a setting, but not too washed out also. So many games today are guilty of hiding their ability to use color effectively by desaturating everything to a muddy brown, which is something I tried to steer away from. Fallout 3 for example, has been a great reference for me as far as detailing goes, but I think they really could have played with color more. So also, you can see that everything is successfully in the engine and in real time. I have tested all aspects of the work flow required to get what I want, and everything is possible to do without too much of a headache. It's really just a matter of plugging in the remaining texture maps, adding some more decals and props to fill in space, fixing up the lighting, and viola! It's done! I'm not concerned too much with making a rigorous schedule for this, but I hope to have it done at the end of September.
As far as civil protection goes, Ross posted on his site saying that he's all moved into LA. So, hopefully in a week or so, we'll get it up and running again. I guess we'll just wait and see.

As you can see, the color mapping for the room is complete. Now when I say room, that's not including any prop work, obviously. I like the way the whole color scheme is looking, as it is not too colorful for such a setting, but not too washed out also. So many games today are guilty of hiding their ability to use color effectively by desaturating everything to a muddy brown, which is something I tried to steer away from. Fallout 3 for example, has been a great reference for me as far as detailing goes, but I think they really could have played with color more. So also, you can see that everything is successfully in the engine and in real time. I have tested all aspects of the work flow required to get what I want, and everything is possible to do without too much of a headache. It's really just a matter of plugging in the remaining texture maps, adding some more decals and props to fill in space, fixing up the lighting, and viola! It's done! I'm not concerned too much with making a rigorous schedule for this, but I hope to have it done at the end of September.
As far as civil protection goes, Ross posted on his site saying that he's all moved into LA. So, hopefully in a week or so, we'll get it up and running again. I guess we'll just wait and see.
Tuesday, August 25, 2009
Arrggggh! Abandon ship, mateys!
This is more just news then actual progress, but I am giving up on the source engine. Lately, I've been going back and forth between giving it another try or just learning another engine. Over the past few days, processes would work, then randomly not work for no reason. So, despite my desire to make content for Team Fortress 2 and Left 4 Dead, I've decided that the headache required to succeed in that is no longer worth the trouble. I have no idea how Valve could have given us such an unintuitive way to create maps with a good conscience, but I will no longer try to make it work. So what am I using now? The unreal engine. I wanted to wait until I was absolutely sure that the process it uses is what I want in a workflow before I said anything to anybody. So here I am, feeling much like I learned to get around on a unicycle when I could have been using a bike the whole time. Silly me. Importing models is retardedly simple, navigation in the level editor is workable, and things actually work. No random errors, tons of programs I need to install, or lack of documentation. At least so far.....we'll see.
Also, my computer has frequently decided to randomly restart itself as of late. I'm working with my computer whiz friend to get it straightened out, though it doesn't affect my ability to work too much. More like a pain in the ass than anything really.
Some new projects might be in the works as well. Lately, I've been thinking about what to do after Chernobyl gets done. I've wanted to take someone's conceptual drawing of a complex object and translate it to 3D as a way to show off my modeling skills. I originally was going to approach someone on a forum and ask them to let me use one of their drawings, but Jake, the guy that was going to help me on the TF2 map awhile back, offered to oblige his drawing talent. We also talked about maybe doing a full level sometime in the future, but for now the focus is on the single object. Everything has been verbal so far, except for some preliminary drawings he's been doing. We literally started this last night.
What about Civil Protection? It's been put on hold for now, due to Ross moving to LA. He'll let me know when things are back on track, but I've got all my stuff completed that he originally gave me. When things get rolling again, I'll post something. Here's a link that explains his situation if you are interested: www.accursedfarms.com
Confused about what the hell I'm doing now? Here's a rundown:
Chernobyl: Currently learning workflows, programs, etc. Once things are figured out, I'll start cranking it out.
Civil Protection: Currently on hold.
Complex Object w/ Jake: Drawings are being made, talks are being had. Mostly preliminary stuff. The stuff I'm learning for Chernobyl will be applied to this as well as future projects.
Future level project w/ Jake: Mentioned, and that's it. Will be a future project.
That's all kids! DISMISSED!
Also, my computer has frequently decided to randomly restart itself as of late. I'm working with my computer whiz friend to get it straightened out, though it doesn't affect my ability to work too much. More like a pain in the ass than anything really.
Some new projects might be in the works as well. Lately, I've been thinking about what to do after Chernobyl gets done. I've wanted to take someone's conceptual drawing of a complex object and translate it to 3D as a way to show off my modeling skills. I originally was going to approach someone on a forum and ask them to let me use one of their drawings, but Jake, the guy that was going to help me on the TF2 map awhile back, offered to oblige his drawing talent. We also talked about maybe doing a full level sometime in the future, but for now the focus is on the single object. Everything has been verbal so far, except for some preliminary drawings he's been doing. We literally started this last night.
What about Civil Protection? It's been put on hold for now, due to Ross moving to LA. He'll let me know when things are back on track, but I've got all my stuff completed that he originally gave me. When things get rolling again, I'll post something. Here's a link that explains his situation if you are interested: www.accursedfarms.com
Confused about what the hell I'm doing now? Here's a rundown:
Chernobyl: Currently learning workflows, programs, etc. Once things are figured out, I'll start cranking it out.
Civil Protection: Currently on hold.
Complex Object w/ Jake: Drawings are being made, talks are being had. Mostly preliminary stuff. The stuff I'm learning for Chernobyl will be applied to this as well as future projects.
Future level project w/ Jake: Mentioned, and that's it. Will be a future project.
That's all kids! DISMISSED!
Subscribe to:
Posts (Atom)